Page 1 of 2 12 LastLast
Results 1 to 30 of 38

Thread: LosMan's 97 Legacy GT-B

  1. #1
    "FNG" LosMan603's Avatar
    Join Date
    Apr 2022
    Location
    New England
    Posts
    57
    Points
    1
    Level
    1
    Points: 1, Level: 1
    Level completed: 0%, Points required for next Level: 1

    LosMan's 97 Legacy GT-B

    I have owned my GT-B for about 3 weeks, and plan to try and keep this as close to OEM as possible. I have made a few very small modifications to the car thus far, most of which I have posted about in the new member forum. I'll begin to use this thread as a journal to record everything about the car from maintenance to modifications.

    Also, I'll post as many delicious pictures of the gtb as possible

    I'll do my best to update this thread any time I have new information, mods or maintenance. Hopefully this will grow and be a great place to record info about this awesome twin turbo platform.
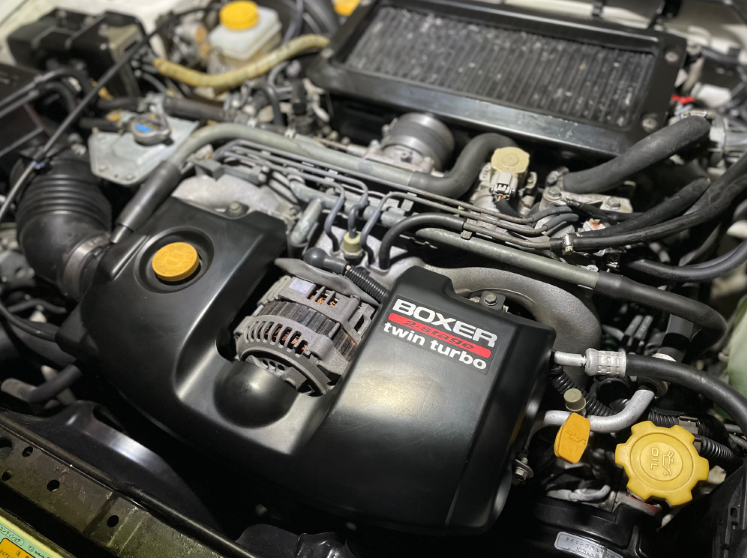

    Engine:
    Valve Cover Gaskets @ 85k KM's
    Fumoto Drain Valve @ 88k KM's
    Laile oil filler cap @ 95k KM's
    Timing Belt Kit @ 95k KM's
    Water Pump & Thermostat @ 95k KM's
    Accessory Belts, hoses, pcv @ 95k KM's
    Cusco Engine Mounts @ 99k KM's
    IAG Oil Pickup Tube @ 99k KM's
    IAG Baffled Oil Pan @ 99k KM's
    IAG Windage Tray @ 99k KM's
    Air Oil Separator Cover @ 99k KM's
    Rear Main Seal @ 99k KM's


    Transmission:
    Cusco Transmission Mount
    Cusco Stainless Slave Line
    OEM Pilot Bearing
    ACT Release Bearing
    Whiteline Transmission Subframe Bushings


    Exhaust
    Trust Stainless muffler & 3" cat back pipe


    Maintenance
    Oil & Filter change @ 85k KM's (Tokyo Roki filter)
    HKS Super Air Filter @ 95k KM's
    650 CCA Battery @ 85k KM's
    Clutch fluid flush @ 87k KM's
    Improved existing BOV install (made a bracket & shortened hose)
    OEM Air filter @ 87k KM's (existing HKS filter was toast)
    Coolant drain/flush @ 87k KM's (reading approx. 9 ph.)
    Blackstone Labs Oil Analysis @ 88k KM's (no foreign materials detected, excellent results )
    Brake fluid flush @ 92k KM's
    Front & Rear differential fluid @ 96k KM's


    Exterior
    JDM Zenki Grille (slightly too small for my Kouki bumper :/)
    OEM Bug Deflector
    OEM Rain Guards
    Full tint on all windows
    Upcoming Stuff: Repair driver side skirt


    Interior
    Bride Door Cards
    Bride Shift Boot
    ProDrive Floor Mats
    GrimmSpeed SS weighted shift knob
    Boost Gauge
    A Pillar Gauge Pods
    Oil Pressure Gauge
    Full LED interior lighting
    Sony touchscreen radio & 400W amp
    JL Audio Speakers
    OEM Cargo Cover
    Upcoming Stuff:Oil pressure gauge, Air / Fuel ratio gauge


    Wheels & Tires
    Falken Ziex 215/45/R17 @ 85k KM's
    Falken RT660 225/45/R17 @ 95k KM's
    Enkei T6S 17x8


    Brakes
    OEM Front Pads, Rotors @ 92k KM's
    OEM Front passenger side caliper @ 92k KM's
    OEM Rear Pads/Rotors @ 95k KM's
    Endless Stainless Brake Hoses @95k KM's


    Suspension
    Whiteline Tie Rod Ends
    Front Camber Bolts
    Whiteline Control Arm Bushings
    Whiteline Ball Joints
    Whiteline Steering Rack Bushings
    Laile Front Strut Bar
    Cusco Front Sway Bar 22mm
    Cusco Rear Sway Bar 21mm
    Whiteline Front & Rear Sway Bar Links
    Cusco Front & Rear Power Braces
    HKS Hipermax S Coilovers
    Beatrush Wagon Bars
    Whiteline Adjustable Rear Lateral Links
    Whiteline Adjustable Rear Control Arms


    Here are a few photos of the car right after I brought her home & started maintenance & upgrades:

    Name:  2022-04.jpg
Views: 203
Size:  79.3 KB

    Name:  oem grille.jpg
Views: 216
Size:  98.1 KB

    Name:  oem grille2.jpg
Views: 203
Size:  138.7 KB

    Name:  Interior.jpg
Views: 202
Size:  112.4 KB

    Name:  ej20r.png
Views: 202
Size:  632.4 KB
    Last edited by LosMan603; 03-27-2024 at 02:30 PM.

  2. #2
    "FNG" LosMan603's Avatar
    Join Date
    Apr 2022
    Location
    New England
    Posts
    57
    Points
    1
    Level
    1
    Points: 1, Level: 1
    Level completed: 0%, Points required for next Level: 1
    I found an OEM cargo cover on Craigslist last week, just cleaned it up and it popped it in the Legacy. Also fitted a small fire extinguisher to the cargo area (I have lost cars to fire before :/)

    Name:  Trunk.jpg
Views: 213
Size:  113.1 KB

  3. #3
    "FNG" LosMan603's Avatar
    Join Date
    Apr 2022
    Location
    New England
    Posts
    57
    Points
    1
    Level
    1
    Points: 1, Level: 1
    Level completed: 0%, Points required for next Level: 1
    While I was walking aimlessly through Harbor Freight, I noticed a boost gauge for sale... only $18? Can this be real? Only one way to find out.

    I'm happy to report, this crappy little boost gauge was a breeze to install. I plumbed it into the #11 vacuum line to the BboD, then wired into the accessory circuit (same as my turbo timer). I then ran the hose through the driver side firewall, by removing a small grommet (ill eventually create a small hole in the grommet to run more stuff through, then silicone it closed.) I decided to run everything up through the driver side defrost vent by the door. Overall its a pretty clean install.

    The gauge seems to be accurate too, registering about 13 psi when I do a good pull getting onto the highway. I'll keep it there for now while I try to figure out an oil pressure gauge, and then some proper way to mount them to the A pillar. I have seen some threads about DIY A pillar gauge pods, I make try to find a pillar from a scrap yard and try it out.

    Name:  Boost Gauge.jpg
Views: 207
Size:  77.6 KB
    Last edited by LosMan603; 05-11-2022 at 02:15 PM.

  4. #4
    New User
    Join Date
    May 2022
    Location
    Japan currently
    Posts
    1
    Points
    1
    Level
    1
    Points: 1, Level: 1
    Level completed: 0%, Points required for next Level: 1
    I love your car and cant wait to see what you do with it. I also have a white gtb '96 model that i plan on doing a full overhaul on when i get moved back to the states from japan in a few months. Did you happen to do the turbo timer install yourself? i am trying to find one but it seems to be hard to find one that is setup to work with the gtb sequential turbo setup.

  5. #5
    "FNG" LosMan603's Avatar
    Join Date
    Apr 2022
    Location
    New England
    Posts
    57
    Points
    1
    Level
    1
    Points: 1, Level: 1
    Level completed: 0%, Points required for next Level: 1
    Thanks, looking forward to seeing and hearing more about your gtb.

    I did not install the turbo timer on this car, however, I have installed them on several others in the past (mostly Nissan applications). As far as I remember, turbo timers are vehicle agnostic, meaning they can be installed on any car.

    The units I had installed only required that I wired them into the ignition, and ground them into the parking brake. That way, when the parking brake is applied the turbo timer has a complete circuit. Anyways, all its doing is bypassing the ignition switch, so the ecu still thinks the ignition is on. Once the timer runs out, it switches back so the car will turn off.

    Long way of saying, any turbo timer should work fine on your gtb.

    You can find the one I have on eBay for around $70, its an old Pivot full auto turbo timer.

  6. #6
    "FNG" LosMan603's Avatar
    Join Date
    Apr 2022
    Location
    New England
    Posts
    57
    Points
    1
    Level
    1
    Points: 1, Level: 1
    Level completed: 0%, Points required for next Level: 1

    Spring Cleaning Festival

    Today was a beautiful day to be out in the garage, so I made a very conscious decision to avoid my real work duties and focus on the dusty old hood liner and 25 years of dirt built up around it. One of the main sore spots (in my eyes) has been how tired and grimy the hood was. I figured, what the hell I might as well just touch it up


    Name:  Hood Liner 1.jpg
Views: 203
Size:  135.5 KB


    In my mind it seemed the easiest way to properly do this would be to remove the hood from the bg5, so that's what I did. (ask a friend for help with this kids, putting it back on alone is tricky). I removed the bug guard, washer fittings and all the trim (only broke 1 plastic fastener!! I sanded everything with 400 grit sand paper, cleaned with mineral spirits.


    Name:  Hood Liner 2.jpg
Views: 188
Size:  131.2 KB


    Once it was dried off, I walked it outside to my makeshift paint booth / wooden board thing. I laid a couple coats of self etching primer, then went to bed. At this point I think I had spent about 2.5 hours total, most of that sanding.


    Name:  Hood Liner 3.jpg
Views: 204
Size:  111.8 KB


    In the AM I sanded the primer with 800, then laid 1 more light coat. After that dried, I used a can of 51E Aspen White that a local parts shop mixed. $28 for a 13oz can, no idea how that compares to other places but please share if you know!


    Name:  Hood Liner 4.jpg
Views: 189
Size:  121.1 KB


    Then came the "hard" part (warning this is also the part where you may hate what I have done)

    I had previously decided I wanted to cover only the thin parts of the hood in fiberglass tape, and not use another fiberglass mat. This is just more of a preference thing for me, I don't think there is any functional benefit. In fact, it is probably the opposite... but I think it looks cool.

    Anyway, if I was going to use a fiberglass tape obviously I needed to use gold foil... so yeah, this is what we ended up with:


    Name:  Hood Liner 5.jpg
Views: 188
Size:  117.4 KB


    I took apart the cowl and rubber under the hood scoop and cleaned / repainted as well. Instead of the black paint I went 2 tone with silver & black. a little more bling lol.

    Overall, I am very happy with it. I think the gold and white are really pretty striking, and better than the dusty old look

    Feel free to pile on, I would love to hear others opinions on this!!

  7. #7
    "FNG" LosMan603's Avatar
    Join Date
    Apr 2022
    Location
    New England
    Posts
    57
    Points
    1
    Level
    1
    Points: 1, Level: 1
    Level completed: 0%, Points required for next Level: 1
    I finally upgraded the audio, since the existing radio did not pick up US frequencies. I had no idea about this, but JDM head units only pick up frequencies up to 89.9.

    I had tried installing a band expander, which was supposed to increase the range to 107.9 but I had no luck. It was easy to install but had zero effect. Now a Sony touch screen head unit and in-line 400W amplifier are installed. I also added JL speakers, and sound proofed the doors. It sounds amazing!

    Name:  Screenshot 2022-09-03 at 8.06.53 PM.png
Views: 145
Size:  717.7 KB

  8. #8
    "FNG" LosMan603's Avatar
    Join Date
    Apr 2022
    Location
    New England
    Posts
    57
    Points
    1
    Level
    1
    Points: 1, Level: 1
    Level completed: 0%, Points required for next Level: 1
    A couple of months ago, I had ordered a Laile strut bar and oil filler cap in a moment of weakness The parts finally arrived and I quickly installed them, since I don't put the BG5 hard into the corners I haven't noticed any difference in handling but the golden powder coating looks great, and maybe adds 1hp

    Name:  View recent photos.jpg
Views: 146
Size:  88.0 KB

    Name:  IMG_5918.jpg
Views: 146
Size:  81.9 KB

    Name:  IMG_5989 (1).jpg
Views: 144
Size:  84.0 KB

    I also ordered larger Cusco front & rear sway bars. I will be bolting them on as soon as I pick out an upgrade for the end links as well. Stay tuned for more delicious pictures of that install.

  9. #9
    "FNG" LosMan603's Avatar
    Join Date
    Apr 2022
    Location
    New England
    Posts
    57
    Points
    1
    Level
    1
    Points: 1, Level: 1
    Level completed: 0%, Points required for next Level: 1
    The front right brake caliper was not releasing pressure, so I decided to replace the caliper and hose. Since I needed to do this quickly, I just ordered parts from my local Napa and they worked great. I also flushed the brake fluid and that definitely improved the pedal feel.

    Longer term, I would like to install the 4/2 pot sti calipers and Endless rotors with Project Mu pads. For now though, the brakes are back to functioning 100%

    Name:  View recent photos (1).jpg
Views: 141
Size:  46.4 KB
    Last edited by LosMan603; 09-07-2022 at 08:10 PM.

  10. #10
    "FNG" LosMan603's Avatar
    Join Date
    Apr 2022
    Location
    New England
    Posts
    57
    Points
    1
    Level
    1
    Points: 1, Level: 1
    Level completed: 0%, Points required for next Level: 1
    The look of a heavily tinted wagon has always looked good to me, so I dropped the car at a local tune shop and had the GTB windows blacked out. What a difference this made to the appearance, I love it!
    Attached Images Attached Images   
    Last edited by LosMan603; 09-07-2022 at 08:13 PM.

  11. #11
    SLi nOOb
    Join Date
    Jun 2015
    Location
    Hartford, CT.
    Posts
    178
    Points
    1,807
    Level
    25
    Points: 1,807, Level: 25
    Level completed: 7%, Points required for next Level: 93
    Achievements:
    1 year registered1000 Experience Points
    Quote Originally Posted by LosMan603 View Post
    Longer term, I would like to install the 4/2 pot sti calipers and Endless rotors with Project Mu pads. For now though, the brakes are back to functioning 100%
    .

    Once you do the 4pot/2pot conversion, that wagon will transform into the animal it should be around the curves. My '99 LGT wagon eats the corners endlessly with the 4pot/2pot setup. If ever you are in CT and need assistance, I will come through. I've helped a friend and we worked HARD to get his Tommy Kaira M20tb up and running smoothly. I'd like to think I'd gotten really good at the twin turbo stuff, especially with Reuben's help.

  12. #12
    SLi O.G. Muse's Avatar
    Join Date
    Jul 2012
    Location
    Willimantic, CT
    Posts
    2,362
    Points
    10,774
    Level
    68
    Points: 10,774, Level: 68
    Level completed: 81%, Points required for next Level: 76
    Achievements:
    VeteranOverdrive10000 Experience Points
    This is a properly gorgeous car. Maybe one of the best looking Subarus, out of the box.

    Quote Originally Posted by Alucard View Post
    .

    Once you do the 4pot/2pot conversion, that wagon will transform into the animal it should be around the curves.
    Can confirm the effectiveness of the 4/2 pots. Of all the things I love about my car, they're probably the biggest thing I love.
    2002 Outback H6 VDC "Blitzen 6"

    Quote Originally Posted by Lancaster6
    A sherpa could rip ass somewhere high up in the Himalayas and my Prius will be blown almost off of the road.

  13. #13
    "FNG" LosMan603's Avatar
    Join Date
    Apr 2022
    Location
    New England
    Posts
    57
    Points
    1
    Level
    1
    Points: 1, Level: 1
    Level completed: 0%, Points required for next Level: 1
    It has been a long time since I updated this thread, but I have been very busy with the Legacy I finally saved up enough to get a lift installed in my garage, so I went into full maintenance mode.

    I ordered on OEM timing belt kit, water pump, thermostat, oil pump and coolant hoses. Using the Company 23 cam lock makes the T belt job pretty easy. This is the 3rd Subaru timing belt job I have replaced & thankfully all have been successful.

    Here's a pic while everything was being taken apart.

    Name:  Oil Pump 1.jpg
Views: 100
Size:  153.1 KB

  14. #14
    "FNG" LosMan603's Avatar
    Join Date
    Apr 2022
    Location
    New England
    Posts
    57
    Points
    1
    Level
    1
    Points: 1, Level: 1
    Level completed: 0%, Points required for next Level: 1
    During my maintenance extravaganza, I also wanted to remove the intercooler and replace the PCV assembly. The OEM hoses were rock hard and not sealing anymore at all.

    I also replaced the clutch slave cylinder hose with an upgraded Cusco braided unit. The OEM are prone to failure so it was sort of preventative, but also just cool since it is Cusco

    Name:  Clutch Line 1.jpg
Views: 101
Size:  80.0 KB

    Name:  Clutch Line 2.jpg
Views: 100
Size:  102.3 KB

  15. #15
    "FNG" LosMan603's Avatar
    Join Date
    Apr 2022
    Location
    New England
    Posts
    57
    Points
    1
    Level
    1
    Points: 1, Level: 1
    Level completed: 0%, Points required for next Level: 1
    While I was removing the PCV hoses, I accidentally cracked the plastic air intake fitting. This is probably the worst possible component to damage on these cars.

    The air intake tube on the twin turbo EJ a HUGE PAIN IN THE ASS to access (with the engine in the car) It is almost impossible to remove without also removing the intake manifold. They are also extremely hard to source, since Subaru stopped production of this part several years ago. I did find a couple available in the Philippines but have no way to verify if the websites were legit.

    After several hours of tinkering and careful discussion with Reuben, I decided to thoroughly clean the area around the fitting and seal the cracked fitting. Here is a picture of the intake tube that i found online. The red circled area in what I cracked.

    Name:  Ait Intake Tube.jpg
Views: 101
Size:  73.4 KB

    After lots of cleaning I managed to slide a small heat shrink tube over the cracked fitting. The heat shrink has a marine grade sealant on the inside which melts and becomes completely air tight. So far the repair has help up quite well.

  16. #16
    "FNG" LosMan603's Avatar
    Join Date
    Apr 2022
    Location
    New England
    Posts
    57
    Points
    1
    Level
    1
    Points: 1, Level: 1
    Level completed: 0%, Points required for next Level: 1
    I also spent a fair amount of time replacing several old coolant hoses & fuel lines. Lots of other vacuum lines were super dry so I replaced those here and there as well.

    I also tidied up some of the engine bay, and decided to sand and repaint the turbo heat shields. Don't tell my wife I degreased them in our kitchen sink.

    Name:  Clean heat shields.jpg
Views: 100
Size:  111.4 KB

    I also sanded and painted the intercooler & EGR manifold to try & match some of the gold Beatrush parts I have been adding on. I used a rattle can of high temp gold paint and the overall results look ok... if you are into gold

    Name:  egr manifold.jpg
Views: 102
Size:  152.7 KB

    Name:  intercooler.jpg
Views: 101
Size:  161.8 KB

    Name:  Engine bay 2.jpg
Views: 100
Size:  104.7 KB

    Name:  engine bay.jpg
Views: 100
Size:  142.4 KB

  17. #17
    "FNG" LosMan603's Avatar
    Join Date
    Apr 2022
    Location
    New England
    Posts
    57
    Points
    1
    Level
    1
    Points: 1, Level: 1
    Level completed: 0%, Points required for next Level: 1
    Once the timing belt and other maintenance was sorted, I decided to install some Cusco sway bars, Whiteline end links, & Cusco front & rear power braces:

    Name:  Power Brace.jpg
Views: 101
Size:  131.0 KB

    Name:  Rear Sway Bar.jpg
Views: 101
Size:  67.0 KB

  18. #18
    "FNG" LosMan603's Avatar
    Join Date
    Apr 2022
    Location
    New England
    Posts
    57
    Points
    1
    Level
    1
    Points: 1, Level: 1
    Level completed: 0%, Points required for next Level: 1
    More recently I have replaced the JDM yellow Bilsteins with a new set of HKS Hipermax coil overs. These ride incredibly smooth on the street, but are definitely stiffer. Currently I have them set 2 clicks below the stiffest setting on all 4 wheels and overall I lowered the car about 1.25" all around:

    Name:  HKS Hypermax.jpg
Views: 99
Size:  96.2 KB

    Since I have been using the car in Autocross this summer, I also added some 200 treadwear Falken RT660 on a new set of gold T6R Enkei's. I think it looks great, & the ride height is spot on for me. I did have to roll the inner fenders for the Enkei's to fit in the rear since I an running 225/45 tires (slightly wider than stock). A cheap Amazon fender rolling tool and my Harbor Freight heat gun made short work of that task.

    Name:  New Wheels.jpg
Views: 101
Size:  158.2 KB

    Name:  New Wheels 2.jpg
Views: 99
Size:  75.0 KB

    While I was in there, I replaced the OEM brake hoses with a new set of Endless braided lines. They are coated in PCV which is supposed to help prevent corrosion (but this car will never leave my garage in bad weather hahaha)

  19. #19
    "FNG" LosMan603's Avatar
    Join Date
    Apr 2022
    Location
    New England
    Posts
    57
    Points
    1
    Level
    1
    Points: 1, Level: 1
    Level completed: 0%, Points required for next Level: 1
    I just popped in a new air filter, how cool is this box!

    Name:  Air Filter.jpg
Views: 98
Size:  121.5 KB
    Last edited by LosMan603; 08-19-2023 at 08:29 PM.

  20. #20
    Keep it going!

  21. #21
    "FNG" LosMan603's Avatar
    Join Date
    Apr 2022
    Location
    New England
    Posts
    57
    Points
    1
    Level
    1
    Points: 1, Level: 1
    Level completed: 0%, Points required for next Level: 1
    My wife finally made it to one of my Autocross events, here are a few pics of us pulling up to the start line.

    It has been so much fun competing with the BG5 this year. I have never participated in any serious motorsports before, so this season was such an eye opener. Being able to push the BG5 on the track has been a great learning experience.

    Name:  Attachment.jpg
Views: 86
Size:  97.3 KB


    Name:  Attachment_1.jpg
Views: 85
Size:  115.5 KB

  22. #22
    "FNG" LosMan603's Avatar
    Join Date
    Apr 2022
    Location
    New England
    Posts
    57
    Points
    1
    Level
    1
    Points: 1, Level: 1
    Level completed: 0%, Points required for next Level: 1
    There are 2 or 3 more track days for me this year, then I'll be parking the BG5 and getting into some maintenance. Looking for any and all advice here.

    I am planning to replace the ball joints & control arm bushings up front, as well as the steering rack bushings (currently very swollen due to a leaky rack). I am also planning to replace the engine & trans mounts with some Subaru Group N units.

    The rear will see new trailing arms and lateral links.

    Question: Which manufacturers could you recommend? I have heard great stuff about the Cusco arms/links for the rear, but the price tag is high. I have splurged on some other Cusco bits in the past, but i want to stick to more of a budget this winter

    P.S. since this is not a daily driver, I dont care about comfort or noise.

  23. #23
    New User
    Join Date
    Oct 2023
    Posts
    4
    Points
    1
    Level
    1
    Points: 1, Level: 1
    Level completed: 0%, Points required for next Level: 1
    Car looks great. Awesome inspiration I just bought my son a white 97 BD5 twin turbo and I was texting him all the pictures of your car haha. Love the wheels too.

    Also what radiator cover is that? I checked the beatrush website and I don't see it?
    Last edited by Holeshot; 11-10-2023 at 03:38 PM.

  24. #24
    "FNG" LosMan603's Avatar
    Join Date
    Apr 2022
    Location
    New England
    Posts
    57
    Points
    1
    Level
    1
    Points: 1, Level: 1
    Level completed: 0%, Points required for next Level: 1
    Quote Originally Posted by Holeshot View Post
    Car looks great. Awesome inspiration I just bought my son a white 97 BD5 twin turbo and I was texting him all the pictures of your car haha. Love the wheels too.

    Also what radiator cover is that? I checked the beatrush website and I don't see it?
    Thanks! I got that Radiator cover from Japan. I think you can order still them on rhdjapan.com

  25. #25
    "FNG" LosMan603's Avatar
    Join Date
    Apr 2022
    Location
    New England
    Posts
    57
    Points
    1
    Level
    1
    Points: 1, Level: 1
    Level completed: 0%, Points required for next Level: 1
    It has been a busy winter so far & I have already made a number of improvements! I am really excited to see how the car will handle on the track this coming season.

    A friend let me borrow his engine hoist, so I was able to pull the EJ20R out of the car.

    Name:  IMG_8627.jpg
Views: 34
Size:  141.3 KB

    Name:  IMG_8786.jpg
Views: 34
Size:  150.3 KB

    Name:  IMG_8782.jpg
Views: 34
Size:  124.6 KB

  26. #26
    "FNG" LosMan603's Avatar
    Join Date
    Apr 2022
    Location
    New England
    Posts
    57
    Points
    1
    Level
    1
    Points: 1, Level: 1
    Level completed: 0%, Points required for next Level: 1
    One of the main components that I knew needed replacing was the engine mounts. Visually I could tell the rubber was very dried & cracked, but when I pulled the engine it was pretty clear they were completely deteriorated.

    Name:  IMG_8678.jpg
Views: 34
Size:  92.7 KB

    Originally I planned to upgrade to the STI mounts, but after some reading I was swayed towards the Cusco mounts. These are a more solid mount which should translate to better handling, but also more vibration/noise. Since this car is not a daily driver, and I want to continue Autocross & begin some road racing, noise & comfort isn't a big concern.

    Name:  IMG_8679.jpg
Views: 34
Size:  86.9 KB

    The Cusco mounts are intended to fit a Bugeye WRX, but the EJ20R is almost 100% the same as those early model WRX... so I figured this was a direct bolt on.

    After I got everything apart I realized the brackets from the EJ20R have a slightly different bolt hole pattern than its US brother. The JDM mounts are about 5mm closer together, so the Cusco mounts wouldn't fit!

    Name:  IMG_8680.jpg
Views: 34
Size:  123.3 KB

    The solution was to use a bracket from the USDM engine, which was an unexpected cost. Not a big deal, & now the mounts are assembled & ready to go back on the block.

    Name:  IMG_8902.jpg
Views: 34
Size:  124.5 KB

  27. #27
    "FNG" LosMan603's Avatar
    Join Date
    Apr 2022
    Location
    New England
    Posts
    57
    Points
    1
    Level
    1
    Points: 1, Level: 1
    Level completed: 0%, Points required for next Level: 1
    While I was working on the engine mounts, I also ordered a Whiteline Anti Lift kit & Roll Center kit. These will help get the steering geometry back since I have lowered the car.

    I also picked up the Whiteline Steering Rack & subframe bushings, replacing all the dried OEM with polyurethane. Sitting to the side is an Spec stage II clutch & lightened flywheel.


    So excited to feel this improvement in the spring!

    Name:  IMG_8759.jpg
Views: 34
Size:  130.5 KB

  28. #28
    "FNG" LosMan603's Avatar
    Join Date
    Apr 2022
    Location
    New England
    Posts
    57
    Points
    1
    Level
    1
    Points: 1, Level: 1
    Level completed: 0%, Points required for next Level: 1
    I learned more about some known oiling issues with the early EJ's. From what I understand, the "welds" on the OEM oil pickup tube are known to crack thus causing a drop in oil pressure.

    The stock oil pan is another weak point in the oiling equation, especially when cornering for sustained periods of time. The oil will tend to accumulate on the sides of the pan during aggressive cornering, resulting in less oil at the bottom of the pickup. It can also pool in between the stock baffles, again causing inadequate oil at the pickup.

    Here is a look at the stock setup:

    Name:  IMG_8889.jpg
Views: 35
Size:  143.7 KB

    Name:  IMG_8890.jpg
Views: 35
Size:  119.6 KB

    Name:  IMG_8894.jpg
Views: 35
Size:  144.6 KB

    After much research & talking with friends, I decided to go with the IAG baffled pan, pickup tube & windage tray set.

    Name:  IMG_8897.jpg
Views: 36
Size:  142.2 KB

    Name:  IMG_8901.jpg
Views: 35
Size:  151.5 KB

    This is really a huge improvement & great peace of mind! One thing I need to figure out... my Fumoto drain valve doesn't clear the bottom of the pan, because the raised cooling fins are in the way.

    I will either need to figure out a threaded insert to push the drain plug away from the pan or use the provided stainless drain plug.

  29. #29
    New User
    Join Date
    Mar 2015
    Location
    Sydney, Aus
    Posts
    23
    Points
    1,680
    Level
    23
    Points: 1,680, Level: 23
    Level completed: 80%, Points required for next Level: 20
    Achievements:
    1 year registered1000 Experience Points
    Fumoto's SX line may do the job..

    https://www.fumotousa.com/SX.html

  30. #30
    "FNG" LosMan603's Avatar
    Join Date
    Apr 2022
    Location
    New England
    Posts
    57
    Points
    1
    Level
    1
    Points: 1, Level: 1
    Level completed: 0%, Points required for next Level: 1
    I had some time to work on the BG5 again recently, the last few bits that needed attention have been replaced.

    The primary reason I pulled the engine in the first place was to replace the plastic oil separator cover & rear main seal. You can see in these pictures that both parts were allowing oil to pass by:

    Name:  2.jpg
Views: 16
Size:  201.7 KB

    Name:  3.jpg
Views: 16
Size:  168.2 KB

Page 1 of 2 12 LastLast

Posting Permissions

  • You may not post new threads
  • You may not post replies
  • You may not post attachments
  • You may not edit your posts
  •